No Page 2:0 only summary

Contents

No Page 2:0 only summary
Page 2:20 Courtesy lighting
Page 2:21 Rear view mirrors
Page 2:22 Front seats
Page 2:23 Child safety
Page 2:24 Seat belts
Page 2:25 Seat belts


Page 2:20 Courtesy lighting

Go To Top of Page.

Courtesy lighting
Courtesy lighting
 
         Spotlight                                Switch  

Courtesy lighting

The courtesy lighting consists of two lights,
one on the inside of each door.
Three switches operate these lights, one at
each light and one on the left-hand side of the
casing in front of the steering wheel.


Switch on steering column

1 Lighting always on.
2 Lighting on when a door is opened.


Switch on lights

These switches are used for switching on and
off the adjustable spotlights in the middle of
the lamp
They can be focused as desired in the car


To give the driver an opportunity of finding the
ignition switch in darkness, the courtesy lights
have a delay function which keeps them on for
about 15 seconds after the driver's door has
been closed (not the passenger's door).


Page 2:21 Rear view mirrors
Go To Top of Page.

Rear view mirrors
Rear view mirrors
Rear view mirrors

Outside rear view mirrors

The switches for adjusting the outside rear
view mirrors are situates on the console for
the parking brake lever.
 

Inside rear view mirror

D Normal position.
N Anti-dazzle position-use if headlights of
    car behind you irritate you.


    Always adjust the rear view mirrors before driving away!


Page 2:22 Front seats
Go To Top of Page.

Adjusting height position

The height of the seat can be adjusted front
and rear to three different positions by means
of the respective levers there.
Make doubly sure that the seat is securely in
position after any adjustments
Never adjust during driving!


Tipping the backrest forwards

Push in the knob to tip the backrest forwards.


Front seat


Lumbar support (SOFT)

Lumbar support (FIRM)
       Fore and aft adjustment       Extra length adjustment         Backrest inclination
Pull up the bar to slide the seat backwards or
forwards. Make sure the seat is properly
locked when the bar is released.
Never adjust during driving!
For long legged persons it is also possible to
move the entire seat frame about 3 cm back-
wards. This adjustment requires tools.
Both front seats are electrically heated.
The heating is controlled by a thermostat and
engages automatically below about +15°C
(59°F) and disengages at about +25C (75°C).
Note that the passenger's seat is switched on
from the switch on the instrument panel, see
page 14


Page 2:23 Child safety

Go To Top of Page.

Childeren in car

A grown-up with fastened seat belt in a Volvo is assured of good Pro-
tection in the event of a collision or other accident.
We give here some advice with a view to protecting your child in the
best possible way from injury in accidents
Remember that, irrespective of its age and size, a child must never
be "loose" in a car. Above all small childeren should not sit on the
lap of grown-ups who are not using seat belts.

Many countries legislate how a child should be placed in a car. Find
out what applies in your country.


The most effective type of protection will depend on the build of the
child.
Childeren can be divided into three different "build groups".


Babies and small childeren who cannot sit up

A baby or a child who is so small that it cannot sit up should lie in a
carry cot, detachable pram top, or something similar, which is placed
on the back seat with the head of the child towards the middle of the
car. To restrain the cot in the event of a sudden swerve or sharp brak-
ing, it should be held securely in position by the rear seat belts or by
the Volvo child bench which is available at your Volvo dealer and
which can be placed on the floor between the front and rear seats.


Childeren from the age when they can sit and to a height
of about 117 cm/almost 4 ft. (6-7 years)


Never use the type of child seat which is suspended from the rear seat.
Use instead the Volvo child seat (available at your Volvo dealer). This
seat is fitted "back-to-front" either on the front passenger seat or on
Child safety


the rear seat. In both cases, fasten the front passenger seat belt round
the seat, even if no one is sitting in it, in order to prevent it from coming
loose in the event of a powerful collision.
The installation instructions supplied with the seat will tell you how to
fit it.


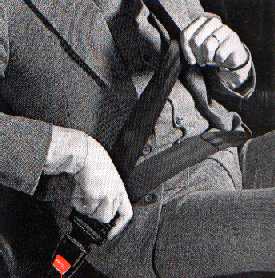
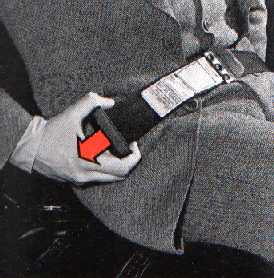
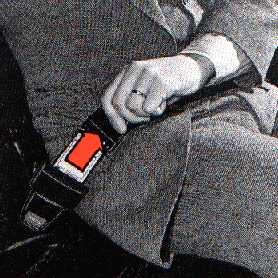
Childeren taller than 117 cm/almost 4 ft (6-7 years)

When the child has outgrown the child seat, it should use the rear
seat and with the standard belt fastened.
The best way to protect the child here is to seat it on a cushion so that
the seat lap belt is as far down on the hips as possible. A cushion spe-
cially designed for this purpose can be purchased from your Volvo
dealer
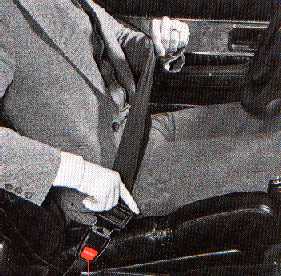
A more detailed description on how to use these seat belts is to be
found overleaf.


Page 2:24 Seat belts
Go To Top of Page.

Seat belts warning lights
Release button Front seats
Release button Rear seats

Seat belts

Always have the weat belt fastened for all
types of driving!!

The above also applies to the rear seat pas-
sengers. In the event of a collision, those sit-
ting in the rear will be flung towards the
front seat backrest. If there is anyone sitting in
the front seat, the seat belt will be exosed to
considerably greater load than what it was
intended for, so that there would be the possi-
bility of injury to both persons. Even abrupt
braking can have severe consequences if the
rear seat belt are not used.
Two warning lights, one on the instrument
panel and one on the console for the parking
brake flash if the car is driven and the driver
or front seat passenger has not fastened the
seat belt.
                  Release button
                     Front seats
                  Release button
                     Rear seats

Automatically retracting inertia-reel
seat belts

The front seats and the rear seat next the
windows have automatically retracing inertia-
reel seat belts.

The belts are fitted as follows:
Pull out the straps fairly slowly to prevent the
mechanism from locking. Push the tongue
down into the lock. A pronounced click indi-
cates that it is locked.
The belt must not be twisted
To release the belt, push in the red button on
the lock. Allow the belt to roll up fully.


Normally the belt is "unlocked".
It is locked, and thus cannot be drawn out:
  • if pulled out too rapidly
  • when braking and accelerating
  • if the car is at a fairly sharp angle
  • when rounding a bend


  • Page 2:25 Seat belts
    Go To Top of Page.

    Manually adjustable seat belts
    Manually adjustable seat belts


    Checking the seat belts

    Manually adjustable seat belts

    The centre rear belt fastens across the
    lap. This is adjusted to the right length as fol-
    lows:


    Lengthening:      turn the adjuster/locking
    tongue and pull the belt out as shown in the
    illustration..

    Shortening: pull in the upper strap.


    Check to make sure that the strap does not
    strick or fray against sharp edges and now and
    again check that the bolts are well-tightened
    and that the belt is otherwise in good condi-
    tion

    Use water and a good quality detergent for
    cleaning the belt

    The locking function of the inertia-reel belt
    can be checked as follows:
  • Fasten the belt and jerk it.
  • Brake the car abruptly at about 50 km/h
         (30 mile/h) or drive round in a arrow circle.
         (But first look out for approaching traffic.)
         Pull the belt.
    During the above-mentioned tests, it should
    not be possible to pull out the belt.
  • WARNING!

    If the belt is exposed to tremendous again, e.g., in connection with a collision, both belt
    and locking mechanism must be replaced, even if only apparently damaged, since the belt
    may have lost its safety effectiveness. The belt should also be replaced if one of the straps
    is damaged or worn.
    Do not try to modify or repair a belt on youw own. Let a Volvo workshop do it.


    Text and pictures from owners manual yearmodel 1980

    Go To Top of Page