
| No Page 4:27 only summary |
Inhalt |
|
No Page 4:27 only summary Page 4:27 Service inspection Page 4:28 Break in period Page 4:29 Driving economy Page 4:30 Starting the engine Page 4:31 Gear shift positions Page 4:32 Automatic transmission Page 4:33 Automatic transmission Page 4:34 Emergency towing (pulling) Page 4:35 Towing information Page 4:36 Trailer hauling Page 4:37 Brake system Page 4:38 Catalic Converter |
| Page 4:27 Service inspection |
Service InspectionTo ensure proper operation the car should betaken to a Volvo dealer between the first 600-1,200 miles (1.000-2.000 km) for a service inspection. The oil in the engine, 4 speed transmission and rear axle will then be changed. This is very important since the oil rapidly collects impurities during the break in period. |
| Page 4:28 Break in period |
Automatic transmissionRefrain from using "kick-down" when drivinga car equipped with an automatic transmission during the first 1,200 miles (2.000 km) |
Manual transmissionDuring the break in period do not exceed thefollowing speeds: | |
| First 600 miles (1,000 km) 1st gear 20 mph (30 km/h) 2nd gear 30 mph (50 km/h) 3rd gear 50 mph (80 km/h) 4th gear 70 mph (110 km/h) 1) 1) 80 mph (130 km/h) with overdrive engaged. Do not use overdrive below 40 mph (65 km/h). |
600 - 1,200 miles (1,000 - 2,000 km) 1st gear 25 mph (40 km/h) 2nd gear 45 mph (70 km/h) 3rd gear 60 mph 100 km/h) 4th gear 80 mph (130 km/h) 2) Avoid driving zt low speed in high gear. 2) 90 mph (150 km/h) with overdrive engaged. |
| Page 4:29 Driving economy |
Economic driving does not mean necessarily driving slowly | ||
| Better driving economy may be optained by thinking ahead, avoid rapid starts and stops and adjusting the speed of our vehicle to im- mediate traffic conditions. Observe the follow- ing rules. perature as soon as possible by driving under light load. a cold engines uses more fuel and is subjest to increase wea. ing short distances. This does not allow the engine to reach normal operating tempera- ture and hard braking. load) in the car. ice has ended. air resistance and therby gas consumption. |
Utilize the transmission to improve fuel econom- my. Use correct gear! (20 km/h) From second to third gear at approx. 20 mph (35 km/h) From third to fourth gear approx. 30 mph (50 km/h) at every opportunity (at speeds in excess of 45 mph = 70 km/h. down feature unles necessary. |
Other factors which decrease gas mileage are The above mentioned items and others are checked at the standard 7,500 Mile (12,500 km) maintenance Service intervals. |
| Page 4:30 Staring the engine |
To start the engine:1. Enter the car and fasten the seat belt2. Apply the parking brake, if not already set. 3. Place the gear selector lever in neutral. (position N or P, automatic transmisssion). 4. Depress the clutch pedal (manual trans- mission) 5. Press down gas pedal about 1 inch=25 mm (¼ of total stroke). 6. Turn key to starting position. When engine has started, release the key and gas pedal. If the engine does not start at once, depress the throttle pedal half way and keep it there until the engine starts. Avoid repeated short attemps to start (fuel is injected every time the starter is engaged when engine is cold). Allow the starter to operate for a longer time (but not more than 15-2- seconds). Do not race a cold engine immediately after starting. |
Engine warm-up - initial driving procedure Experience shown that engines in vehicles driven short distances are subject to abnor- mally rapid wea because the engine never reaches normal operating temperature. It is therefore beneficial to reach normal operating temperature as fast as possible. This is achieved by driving with a light load as soon as possible |
WARNINGAlways open the garage doors fully before starting the engine inside the garage to ensureadequate ventilation. The exhaust gases contain carbon monoxide which is invisible and odorless but very poisonous |
| Page 4:31 Gear shift positions |
|
|
|
4 speed manual transmission |
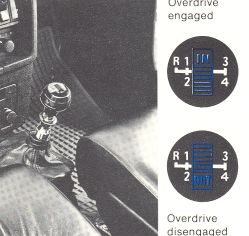
Overdrive |
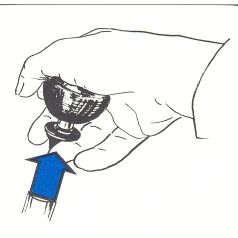
Reversing inhibitor |
|
Depress the clutch fully when changing gears. |
Shift to overdrive at 45 mph (70 km/h) and disengage it when speed drops below 40 mph (65 km/h) or vehicle encouters hilly terrain. The overdrive can be engaged in 4th gear only. No extra operation of clutch or trottle pedal is normally necessary. Engagement is facilitated if the accelerator pedal position is maintained steady. When disengaging, depressing the clutch slightly makes a smooth transfer. The overdrive should be used after the engine has reached normal operating temperature (minimum time is five minutes) and the vehicle is being operated on relatively level roads. Downshifting to a lower gear will automatically disengage the overdrive. |
Lift the ring to enter reverse gear. The ring locking mechanism prevents reverse gear from being engaged unintentionally. |
| Page 4:32 Automatic transmission |
 |
 |
P ParkUse this position when parked with the enginerunning or stopped. Never use P while car is in motion. The transmission is mechanically locked in position P. Also use the parking bake when parking on grades. R reverseNever use R whele car is moving forward.N neutralNeutral position = no gear is engaged. Use parking brake. Driving gears
D is the normal driving position. Upshift anddownshift of the three forwards gears occurs automatically and is gouverned by throttle opening and vehicle speed |
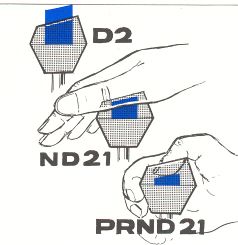
Shift positionsP parkingR reverse N neutral D drive 2 intermediate 1 low The gear selector can be moved freely between D and 2. The other positions are separated by a lockout which is operated by depressing the selector knob. |
Shift gateDepressing the selector knob slightly allowsselections of positions N and 1. Depressing the selector knob fully allows selection of positions R and P. This is also necessary when initially bringing the selecor out of position P. Depressing the selector knob fully thus permits shifting freely between all positions. |
| Page 4:33 Automatic transmission |
2, intermediate positionupshift and downshift of first of two gears (lowand intermediate0 occurs automatically. No upshift to 3rd (top) gear occurs. Position 2 may be used to obtain forced down- shift to 2nd gear for increasing engine braking effect. Position 2 can also be used ... cise speed control is desirable Top speed when selecting is 75 mph (125 km/h). 1, low positionIf position 1 is selected when driving at highspeeds, 2 is engaged first and 1 when the speed has dropped to approx 30 mph (50 km/h). NOTE: No upshift once 1 is engaged. Use position 1 to select low gear with no up- shift. For instance, when entering and des- cending steep grades. Top speed when selecting 1 is 75 mph (125 km/h). |
Kick-downAutomatic shift to a lower gear is achieved by depressing the trottle pedal briskly (passing the normal full throttle position). An up-shift will be achieved when approaching the top speed for a particular gear or by re- leasing the trottle pedal slightly. Kick-down can be used for maximum accele- ration or when passing at highway speeds. |
Starting and stopping a car equip-
1. Fasten the seat belts. | NOTE:still with the engine idling. |
| Page 4:34 Emerency towing (pulling) |
 |
 |
|
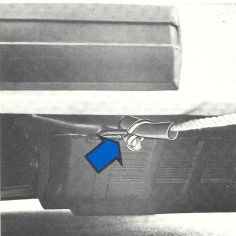
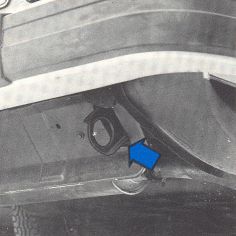
Precautionary steps to observe when towinginoperative. Pedal pressure required is 3-4- times above normal and greater steering effort must be employed - Gear selecor in position N. Check transmission oil level (see section titled "Transmission oil"). - Maximum speed: 20 mph )30 km/h). - Maximum sdistance: 20 miles (30 km). |
Jump starting, see section titled | |
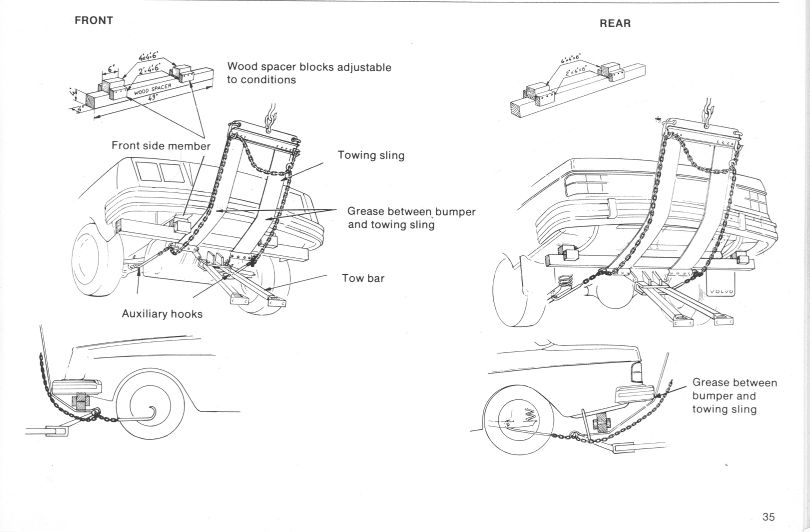
| Page 4:35 Towing information |
| Page 4:36 Trailer hauling |
When preparing for trailer hauling,
|
Trailer hauling does not normally present any particular problems, but take into considera- tion: 200 lbs (90 kgs). increased loads. and economy. the towing vehicle brakes to provide a safe stop (chsck and observe State regulations). Remove the ball and drawbar assembly when the hitch in not being used. Roof rack (removable)vehicle and rigidly attached. It is not advisable to let the roof rack remain. in place during extended periods of time. Also, an empty roof rack increases drag and fuel consuption. are influenced by the load weight. tance. Drive carefully. Avoid rapid starts, heavy cornering and heavy braking. |
Handling, roadholdingVehicle load, tire design and inflation pressure are impotant for proper handling. Therfore check that the tires are inflated to the re- commended pressure according to the vehicle load. It is recommanded to use tires of the same make and dimension on all four wheels. CAUTION: Do not mix radial ply and bias ply tires as this will adversely alter the vehicle handling characteristics. WARNING: do not drive with trunk
oisonius exhaust gases may enter via the |
| Page 4:37 Brake system |
Air dam (front spoiler) |
Moisture on brake discs and brake |
Failure in one of the brake circuis |
An air dam can negatively influence the normal flow of cooling air to the front wheel brakes. Therfore, special light alloy wheel rims must be used in cojunction with air dam. (See section titled "Wheels and Tires"). |
Driving in rain and slush or passing through a normal car wash discs and pads. This will cause a delay in braking effect when the pedal is depressed. To avoid such a delay, when the brakes are needed, depress the pedal occasionally when driving. This will remove the water from the brakes. This should also done after washing or starting in very damp weather. |
 The brake failure warning ligh goes on. The pedal stroke increases slightly and the pedal feels softer but the pedal pressure required does not increase noticeably Drive cautiously to a Volvodealer or Service Station to have the brake system checked. |
If the brake power assist does not |
Severe strain on the brake system |
The power assist to the brakes functions only when the engine is running. When the car is moving without the engine running the brake pedal pressure rewuires to stop the car is increased 3-4 times. The brake pedal feels stiff and hard. |
The brakes will be subject to severe strain when driving in mounains or hilly areas. The speed is usually low which means that the cooling of the brake is less efficient than when driving on level roads. To reduce the strain on the brakes it is advisable not to use the brakes excessively Instead, shift into a lower gear and let the engine help with the braking. A good rule is to use the same gear downhill as would be used uphill. For vehicles with automatic transmis- sion use position 2 or in some cases1. |
| Page 4:38 Catalic Converter |
Catalytic Converter |

|
engine malfunctions, particularly involving the electrical, fuel or ignition systems, may cause unusually high converter tempera- tures. Do not continue to operate your vehicle if you detect engine misfire, noticeable loss of power or other unusual operating condition, such as engine over- heating, repetitive stalls or backfires. A pro- perly tuned engine will help avoid mal- functions that could damage the Catalytic Converter. |
medifications to the engine or the vehicle may be illegal and can cause catalyst or ex- haust system overheating. This include: Altering fuel injection settings or compo- nents. Adjusting ignition timing beyond specified limits. Altering emission system components or location or removing components. |
materials, such as grass or leaves, which can come into contact with the hot exhaust system and cause such materials to ignite under certain wind and weather conditions. minute) with an intermittently firing or flooded engine, can cause catalyst or exhaust system overheating. This also applies to lengthy pushing or towing of vehicle to start (manual transmission only). | |
| |||
![]()