| Page 2:1 This index |
Body and interior |
|
Page 2:1 Body and interior this index Page 2:2 Doors and locks Page 2:3 Central locking, Sun roof Page 2:4 Interior lightning Page 2:5 Rear view mirrors, inner and outer Page 2:6 Front seats Page 2:7 Child safety Page 2:8 Seat belts Page 2:9 Seat belts Page 2:10 SRS Page 2:11 SRS Page 2:12 Boot Page 2:13 Transportation of long loads Page 2:14 Storage compartments Page 2:15 Bonnet Page 2:16 Refuelling |
| Page 2:2 Doors and locks |
Door locks |
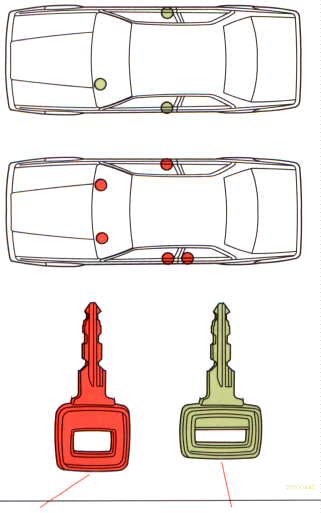
| The vehicle is equipped with a central locking system. This means that the lock on the driver's door controls the lock on the pas- senger's door. The passenger's door can also be locked with the key but this does not affect the central locking system. |
| Page 2:3 Central locking, Sun roof |
| Central locking The doors can be locked and unlocked from the inside using the switch on the driver's door armrest. The doors are locked when the door buttons are in the down position.
| Sun roof The sun roof is manouvered electrically by a switch on the dashboard - the ignition key must be turned to position II. Once you re- lease the switch the sun roof locks into posi- tion. To close the sun roof depress the opposite side of the switch. If there is a fault in the electrical system so that you are unable to close the sun roof with the switch, it can be closed manually, see 5:18 for instructions. The sun roof is supplied with a manually adjustable sun shade. Note: do not slide the sun shade furher back than the edge of the sun roof. |
| Page 2:4 Interior lighting |
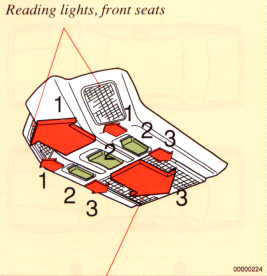
Courtesy light, front reading
The courtesy lighting consists of a roof light |
To avoid battery drainThe interior lighting and the red warninglamps on the back edge of the doors turn on when either of the door open for a long period and want these lights turned off press in the door contacts and turn them clockwise a little. The lights switch off. When the doors are closed again the contacts re- turn to their normal postion. |
Rear reading lightsThere are two adjustable reading lights forrear seat passengers. The lights are turned on and off by the switches on the arm rests. In order to switch these lights on the key must be turned to "radio" position. |
| Page 2:5 Rear view mirrors |
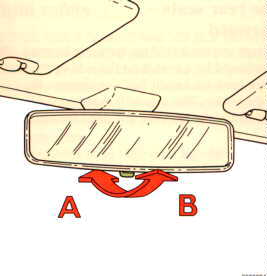
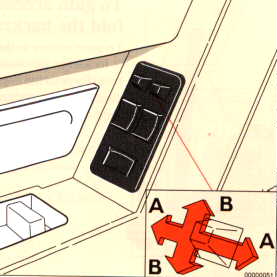
Interior rear view mirrorA Normal positionB Anti-dazzle position. Use this position to reduce the glare from the hedlamps behind you |
Electrically operated door
The control switches are located in the dri- |
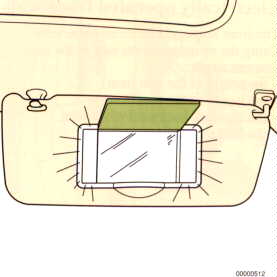
Vanity mirror lightBoth lamps light up when the cover is opened. |
| Page 2:6 Front seats |
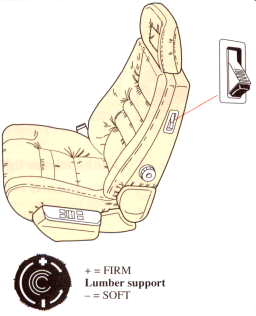
Electrically operated front seatsThe frontseats are electrically operated.Using the switches on the side of the seats you can adjust: - the height of the seat (rear) - the height of the seat (front) - the forward-backward movement - the backrest tilt |
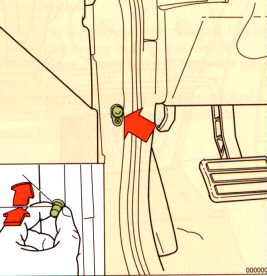
To gain access to the rear seats -
To gain access to the rear you must fold the backrest forward. This |
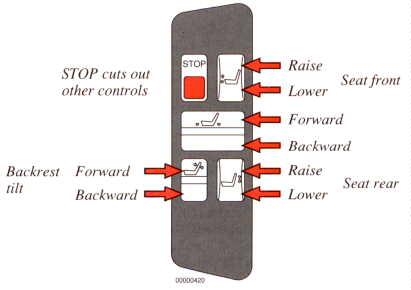
| The STOP button cuts out the other controls. This is a safety feature to prevent accidental movement of the seat. A small crank is supplied with the tool kit. This can be used to adjust the position of the seat (forward-backward and backrest tilt) if the power control malfunctions. See 5:19. |
| Page 2:7 Child safety |
Child safetyAn adult with a fastened seat belt in a Volvo is well protected in theevent of an accident, a sudden swerve or sharp braking. In order to give your chideren the same protection follow the advice given here about how where childeren-should be carried in the car. Remember, childeren, irrespective of size or age, must always be safely restrained in the car. Never let small childeren sit on a passenger's lap. Many countries have their own legislation governing how and where childeren should be carried in the car. Find out about the regulations existing in you county. The best type of protection depends on the size of the child. Childeren can be classified into 3 groups for this purpose: BabiesBabies who are unable to sit up alone should sit in a suitable re-straint. Seats are available even for new-born babies so that they can travel as safely as older childeren. Your volvo dealer will be pleased to advise you regarding the correct type af restraint for your child. Childeren - from when they can sit to a height of
Childeren in this group should always travel in a child safety seat. The |
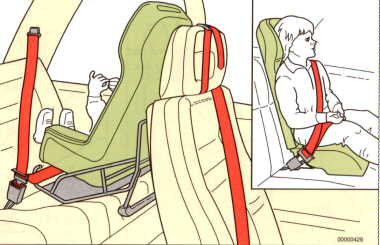 Childeren taller than 117 cm (over approx. 18 kg)Once the child has grownout the child safety seat he should sit on aVolvo safety cushion in the rear seat with the standard 3-point seat belt fastened. This cushion is available at your Volvo dealer. The cushion is specially designed so that the seat lap belt sits as far down on the hips as possible and ensures that your child is pro- tected in the event of an accident. The use of seat belts is described overleaf. |
| Page 2:8 Seat belts |
 Two warning lamps, one on the dashboard and one in the rear seat, flash if the driver has not fastened his seat belt. |
 |
 |
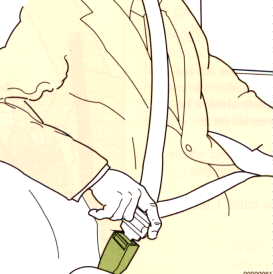
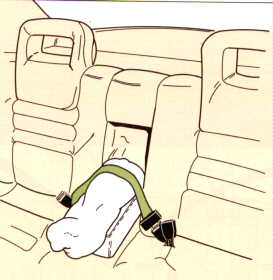
Seat belts should always be wornEven abrupt stops can result in serious con-sequences if you or your passengers do not use the seat belts. Ask all passengers to use the belts. Remember in the event of an accident, unbelted rear seat passengers will be thrown forward against the front seats which will then be placed under considerable strain, more than they are intended to take. As a result all occupants may be seriously injured. The front and rear seats are equipped with inertia-reel seat belts. To fasten: Pull the belt slowly from the holder and |
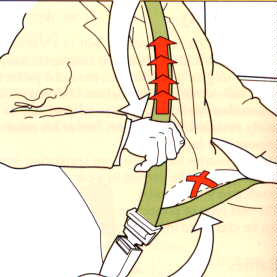
insert the belt tongue into the buckle until you hear a snap and feel the latch engage. The belt is normally not locked and you can move freely. The reel locks the belt im- mediately: To ensure maximum protection it is important that the belt is adjusted to obtain a snug fit. Remember: hips (not pressing against the abdomen). |
Adjust the fit of the lap belt by pulling the shoulder portion of the belt as illustred. the belt is designed for one person only, a special safety feature in the 780 is the belt tensioner. In the event of a collision the tensioners are designed to immediately tighten the seat belt and therefore protect the occupant from being thrown forward. To release: Press in the red button and allow the belt to retract fully into the holder. |
| Page 2:9 Seat belts |
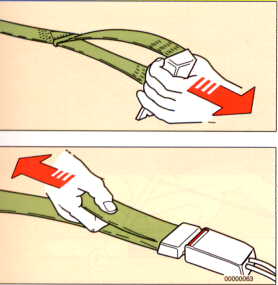
Seat belt checkInspect the belts periodically for sign ofabrasion or wear and ensure that the scews for the anchorage points are correctly tightened. Use water and a mild detergent for cleaning soiled seat belts. Check the locking action of the inertia reel by: tight circle while pulling on the belt (traffic conditions permitting). Note:In some countries the legislation states that everyone in the car must fasten their seat belts. |
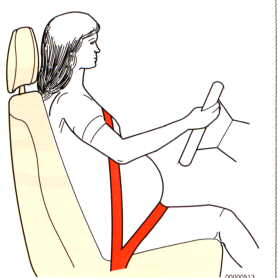
| Pregnant woman Pregnant woman should always wear seat belts. It is very important that care is taken when adjusting the belt to ensure that the pal belt is worn low and snug to prevent any pressure on the abdomen. See above. |
| The centre lap belt is not of the inertia reel type and must be adjusted to the most suitable position so that if fits snugly on the hips. |
CAUTION:If a belt has been to considerable strain -for example a collsion - theentire seat belt, i.e., the seat belt including the retracting and locking mechanism plus all anchorage bolts, must be replaced, even if it appears undamaged, since its energy absorb- ing properties will have been affected. Both seat belts in the front seat must be replaced after an accident, even if only one of the belt was in use. This is because the belt tensioner is no longer operative. Should you have any enquiries regarding the use of the seat belts, consult the manufacturer or agent. Never make alternations or additions to a belt on your own but have this done by a Volvo workshop. |
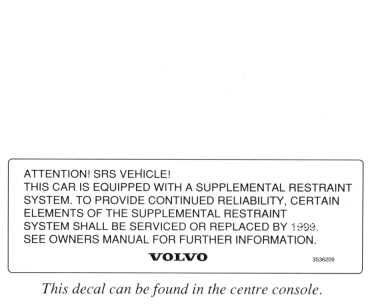
| Page 2:10 Supplemental Restraint System |
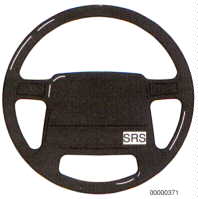
| The Volvo SRS consists of a driver's side airbag with a driver's side knee bolster. The system is designed to supplement the protection provided by the three-point seat belt system. The airbag is folded and located in the centre of the steering wheel. It is released only during a frontal or frontal-angular collision in which the forces sustained by the car are equivalent to an impact into an immovable barrier at the speed of approximately 12 mph (19 kph) or greater. |
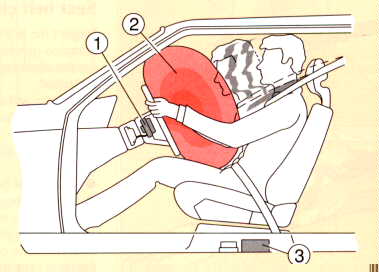
The airbag system includes a gas generator (1), surrounded by the airbag itself (2). In the event of a considerable impact the sensor (3) activates the gas generator causing the airbag to be inflated. to cushion the impact the airbag is gradually emptied as it is compressed by the movement of the driver. At the same time some smoke is expelled into the car. The entire process, including inflation and deflation of the airbag, takes approximately two-tenths of a second. |
WARNING!As its name implies, SRS is designed to be aSUPPLEMENT to - not a replacement for - the three-point belt system. The airbag is not designed to be released in the event of a side or rear-end collision, or during a rollover situation. For maximum protection, wear seat belts at all times. |
WARNING!Do not attempt to service any component of the SRSyourself. Attempting to do so may result in serious personal injury. Of the need for services arises, take your car to the nearest authorized Volvo Dealer for inspection as soon as possible. |
| Page 2:11 Supplemental Restraint System |
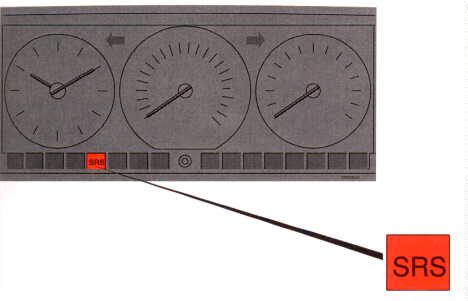
| A self-diagnostic system incorporated in the sensor monitors the SRS. If a fault is detected, the "SRS" warning light will illuminate. The light is included in the warning/indicator light cluster in the instrument panel. Normally, the SRS warning light will be illuminated along with the other warning/indicator lights when the ignition key is turned to the ON position (position II), and go out a short time after the engine has been started. Check that this light is funcioning properly every time the car is started. |
| There is no maintenance to perform on the SRS yourself. The only periodic maintenance recommended on the SRS is that the air bag module and the sensor unit should be replaced every ten years and that the other components in the system (wiring, connectors, etc.) should also be inspected at this time. This service must be performed by an authorized Volvo dealer. Should you have any questions about the SRS sytstem, please contact your authorized Volvo Dealer. |
WARNING!If the warning lights stays on after the engine hasstarted or if it comes on while you are driving, drive the car to the nearest authorized Volvo Dealer for inspection as soon as possible. |
| Page 2:12 Boot |
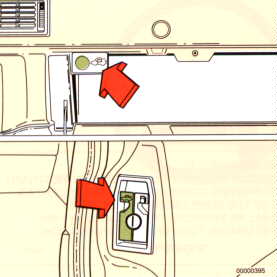
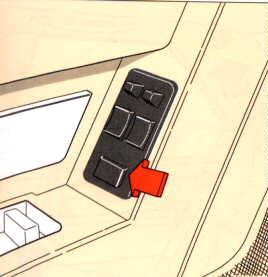
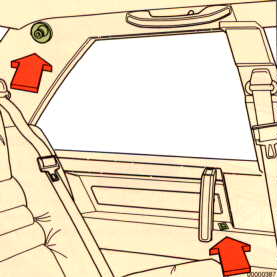
| Opening the boot The boot lock can be released automatically by actuating a push button switch in the glove box. The lock can also be released by using the release lever situated in the rear pillar on the driver's side. Always lock the boot with the key when you leave the car. The lock is also situated in the rear pillar on the driver's side. |
| Page 2:13 Transportation of long loads |
If use is made of the boot hatch to carry |
Take care when loading/unloading the |
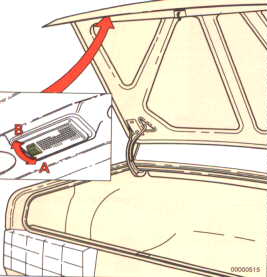
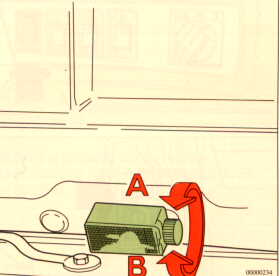
| Boot lighting A The light is allways off B The light comes on when the boot is opened |
Boot hatch The panel behind the rear seat armrest can be removed if long objects are to be trans- ported. Please note that only light loads should be carrie in this way. Max. lengt 2m Max. weight 15 kg |
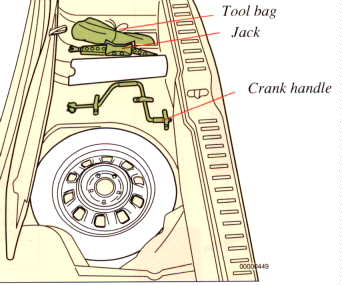
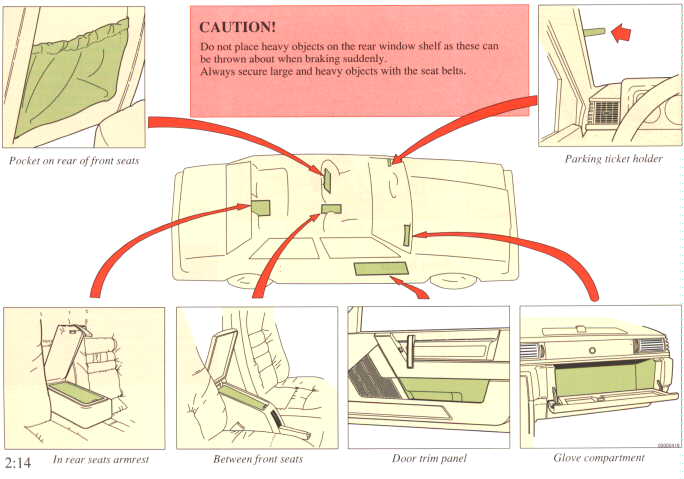
| Page 2:14 Storage compartments |
| Page 2:15 Bonnet, Engine compartment lightning |
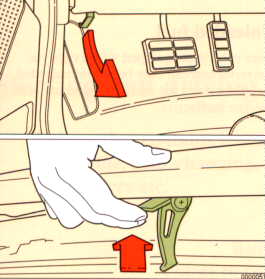
Opening the bonnetPull the release lever beneath the left-handend of the dashboard. The bonnet will spring out of its lock. Lift up the bonnet slightly and depress the safety catch. Open de bonnet. Check that the bonnet locks properly when closing it. |
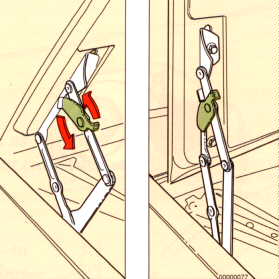
The normal opening position for the bonnet is approximately 55°. By turning the catches on the hinges as illustrated, the bonnet can be opened to a vertical position. The catches return to their normal position on closing the bonnet. Take care in low roof garages |
Engine compartment lightA the light is always off.B The light comes on when the bonnet is opened. |
| Page 2:16 Refuelling |
Unleaded fuelYour vehicle is equipped with a catalyticconverter and can only be run unleaded fuel. Otherwise the catalytic converter will become ineffective. |


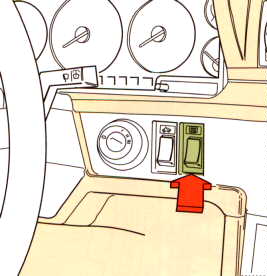
Fuel cap coverA switch on the dashboard opens the fuel capcover. The ignition key must be in position II You can also open the fuel cap cover by pulling the release lever which is situated in the rear pillar on the driver's side. |
Refuelling-unleaded fuelThe fuel cap is located behind the flap onthe left hand wing. The cap can be placed in the bracket on the inside of the cover when refuelling. After filling the tank, screw on the cap until a click is heard. The tank can hold 80 litres. |
![]()