
| No page 9:60a only summary |
Content |
|
No page 9:60a only summary Page 9:60 Windscreen wipers Page 9:61 Body care Page 9:62 Body care Page 9:63 Body care Page 9:64 Body care |
| Page 9:60 Windscreen wipers |
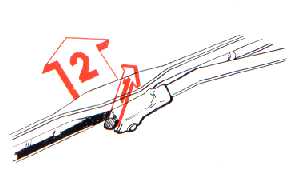
Replacing windscreen wiper bladesHinge out the wiper arm. Press up the smallmetal tongue (1) and withdraw the wiper blade upwards (2). Snap into position the new wiper blade |
Replacing headlamp wiper bladesHinge out the wiper arm. Bend up the resilientwasher (1), suitably with a screwdriver. With- draw the wiper blade outwards (2). Snap the new wiper blade into position so that it grips properly on both sides. | |
| ||
| Page 9:61 Body care |
WashingYour car should be washed as soon as it gets dirty, particularly duringthe wintertime when road salt and moisture can cause corrosion. The car can be washed as follows. etc.). water. Tepid, and not hot, water should preferably be used. applied, but this should be done where proper drains are available for this in order not to pollute the environment. Remeber also to clean the drain holes in the doors and sills.
Drain holes |
Suitable detergents: Car wash or 5-10 cl ordinary dishwasher to 10 litres (2.2 UK gal) water. Spots on trim moulding round windows, wings and doors can be re- moved with a suitable polish (never use abrasive grinding paste or steel wool). Other chromed parts can be cleaned with a chrome re- storer. Automatic car washBefore driving your car into a wash tunnel for automatic washing,move the headlight wipers down past their parking position. This is to prevent the brushes snatching at the arms and possibly damaging the wiper mechanism. NOTE! But dont't forget to restore the wipers to their normal parking position afterwards It is worth remembering that an automatic wash can never be as thorough as a manual one. Polishing and waxingYou should polish and wax your car when the surface finish begins tolose its lustre and ordinary washing is no longer sufficient to make it shine again. Normally it is not necesaary to polish your car for least one year after delivery. However, it may be necessary to wax it sooner. Wash and dry the car throughly before polishing and/or waxing it. Use tar remover or equivalent for removing with a fine abrasive paste in- tended for this purpose. Polish first with a suitable agent and then wax the car. Either fluid or solid wax can be used. Many agents contain both polishing agent and wax. It is not enough to wax a dull surface. It must be polished. |
| Page 9:62 Body care |
Touching-up paintwork damageThe paint on a car is an important part of itsprotection against rusting. It should, therefore, be checked regurly for damage. damaged paintwork requires immediate attention in order op avoid rust. the more common blem- ishes, wich you yourself can remedy, are: Your car should be well-cleaned and dry and the temperature should be above +15°C (59°F) when about to remedy any paintwork damage. Colour codeRefer to the colour code on the service plateat the edge of the right-hand door to en- sure you get the proper colour. Colour code 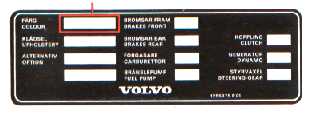 |
 Minor gravel damage or scratchesMaterialtube or tin. "paint pen" (the paint pen head also con- tains grinding paste for any subsequent treatment) If the gravel damage has not penetrated down to the metal and there is still a layer of undamaged enamel, lightly scape off any dirt and apply the paint to the damaged spot. |
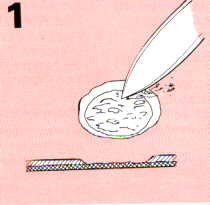
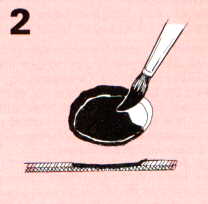 If the gravel damage has penetrated down to the metal, proceed as follows: 1. Scrape the damaged surface clean and then bevel off the paint edges with a penknife or similar (illustration 1). 2. Apply rust remover (protect eyes and hands), wait several minutes and then flush well with water. then wipe dry. 3. Shake the primer well and apply it to the damaged part with a fine brush or match- stick (illustration 2). 4. When the primer has dried, paint on a sur- face coat with a brush. Make sure that the paint has been well stir- red and apply it lightly several times and allow it to dry between each application. |
| Page 9:63 Body care |
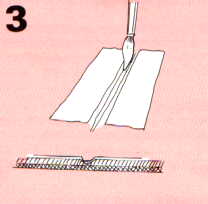
| 5. For scratches, proceed as previously, but it may be advisable to use masking tape to protect the undamaged paintwork (illustra- tion 3). 6. Wait a day or two to do any subsequent treatment that has to be done. The paint paintcontainer head contains grinding paste which can be used to polish off any blem- ishes. Use a soft rag and apply the paste sparingly. |
Touching-up flaking round wing
Material: |
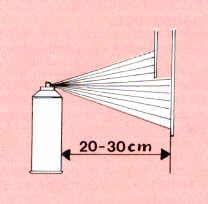
3. Apply the rust remover (protect eyes and hands), wait several minutes and then flush well with water. Then wipe dry. 4 Shake the spray bottle for at least 1 minute. Spray on the primer. Move the bottle slowly and evently forwards and bachwards over the spot and about 20-30 cm (8-12 in.) from it. protect the surrouding surface with suit- able paper 5. When the primer has dried, spray on the sur- face enamel in the same way. Spray on several times and allow the paint to dry a minute or so between each application. |
| Page 9:64 Body care |
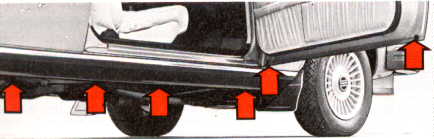
RustproofingYour Volvo was rustproofed at the factory.A thick layer of durable rustproofing compound was applied to the out- side of the underbody and the wheel housings. A thinner rustproofing was used for beams and boxed-in sections. Check and if necessary touch-up the external rustproofing at regular intervals and at least once a year. If the rustproofing has to be touched- up, this should be done immediatly in order to prevent moisture from seeping in under the coating. Clean thoroughly and remove any loose particles before touching-up. The rustproofing used for beams and boxed-in sections need not be re-treated during the first three years, but thereafter at least every two years. Vinyl roofClean water is generally required for cleaning a vinyl roof. Car washcan be added if necessary. If the roof is very dirty, methylated spirit or paraffin can be used to re- move the dirt. However note that the roof should then be rinsed well with clean water as soon as possible. A hole in the vinyl roof must be repaired by an expert immediatly otherwise there is risk of water getting in under the vinyl material and causing corrosion. |
Cleaning the upholsteryThe leather upholstery on seats, panels and door panels is cleanedwith a damp cloth, possibly with a mild soap solution. Never scape or rub a stain. Never use strong spot removers. With major stains, use white spirit but carefully. Wipe afterwards with a mild soap solution and lukewarm water. Cleaning the seat beltsUse water and a synthetic detergent.Cleaning the carpetsThe carpets should be vacuum-cleaned or swept clean regurarly,particularly during the wintertime. Treating carpets stains Treat the stain as quickly as possible. Remove most of the stain with a dull knife or similar. Then use clean white rags to soak up as much of the stain as possible. Vacuum clean round the stain in order to remove any loose dirt. Slight stains can be removed with a tepid detergent. A stain remover should be used for removing bigger stains. In which case proceed as follows Moisten a clean white cloith with the cleaner. Then use a dry piece of cotton to soak up the solution and the stain. Repeat this procedure un- til the stain has been removed. |
![]()