
| No page 8:55a only summary |
Content |
|
No page 8:55a only summary Page 8:55 Wheels and tyres Page 8:56 Wheels and tyres Page 8:57 Wheels and tyres Page 8:58 Changing wheels Page 8:59 Changing wheels |
| Page 8:55 Wheels and tyres |
Checking and correcting tyre pressureCheck the tyre when refuellingCorrect the tyre if necessary but only when the tyres are cold. A warm tyre should only be pumped if the pressure is too low. It only takes a couple or so miles of driving to increase the tyre pressure and thereby also the air pressure. Tyre pressure, cold tyres, in kPa 100 kPa=1 kp/cm=14.2 psi)With lengthy driving at high speed (longer than 1 hour above 120 km/h= 75 mile/h) or driving in a hot climate the tyre pressure should be increased by about 30 kPa (0.3 p/cm²=4psi). Does not apply to "Space Saver" Spare. |
Tread-wear indicatorThe tyres have a so-called "tread wear indicator" in the form ofsections of the tyre tread with slightly deeper pattern. It is high time to change a tyre when it is worn down so much that these sections become prominent.Remember that a tyre worn down to more than 1/16" has very poor grip when driving in rain or snow. | ||||||||||||||||||||||
| Examples of different types of tyre wear |
| Normal wear |
| Too low pressure |
Too high pressure |
Faulty camber |
Faulty toe-in |
Imbalance |
Wear indicator, front |
| Page 8:56 Wheels and tyres |
Some tips on how to avoid unnecessary wearhefty braking. Winter equipmentStudded winter tyres should have a running-in distance of between500 and 1000 km (300 and 600 miles). during which driving should be smooth to enable the studs to bed well into the tyre. A wheel should rotate in the same direction of rotation throughout its entire lifespan. So, if you want to change round the wheels, make sure that they are on the same side throughout. For best comfort and safety, we recommend the Volvo winter wheel. Snow chains can be used on the rear wheels providing that they are of the fine-link type and do not project so much from the tyre that they can scrape against the brake calipers or other parts. You should try to avoid driving with snow chains on bare ground since this wears hard on the chains. Volvo dealers have snow chains designed and approved by Volvo. Note that the maximum speed with snow chains fitted is 60 km/h (38 mile/h) Rapid links must not be fitted since the space between the brake cali- pers and rims does not permit this. |
|
| Page 8:57 Wheels and tyres |
Compact stowaway spare tyreYour car has been provided with a special typeof spare tyre in order to save space. This tyre is intended only for accasional use and is stowed without air. It can be filled from a compressor which is supplied with the car's equipment and which is connected to the cigar lighter power socket. The pressure for this tyre is 250 kPa (35 psi). The wheel valve contains a safety valve which prevents the tyre from being filled with ex- cessive pressure. Tyre and rim comprise a single unit which must never be separated. Should the tyre become damaged, the entire unit must be replaced by a Volvo workshop Note! Current legislation forbids the use of this type of tyre other dan in connenction with a puncture in one of the other tyres, and then only to enable the car to be driven to the nearest tyre repair workshop or sililar where it can be replaced with a proper tyre. It must also be remembered that because of its design and its simple pattern, this tyre has poorer roadholding.Speed must not exceed 80 km/h (50 mile/h) with this tyre fitted. |
Air compressorThe air compressor is operated by connectingit to the cigar lighter power socket. If it does not function then the reason may be a faulty No. 1 fuse or tobacco residues in the socket prevent proper electrical contact. Do not use the compressor continuously for more than 20 minutes as this will cause over- heating. Avoid overloading the compressor with a pressure higher than 400 kPa(=4 on the pres- sure gauge scale). Fitting the spare wheel1. Jack up the car and remove the damaged(punctured) wheel. 2. Fit the spare wheel and screw tight the nuts. 3. Connect the compressor air hose to the wheel valve. |
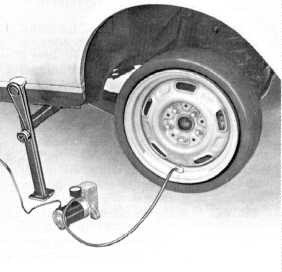
4. Connect the compressor plug contact to the cigar lighter power socket. The cable should run through the open side window in order to avoid possible damage from clamping, etc. 5. Fill the tyre to a pressure of 250 kPa (be- tween 2 and 3 on the pressure gauge scale). When this pressure has been reached, dis- connect the compressor and screw on the protective cap on the wheel valve. 6. Lower the car and tighten up the wheel nuts crosswise. Then drive to the nearest tyre repair workshop and change the spare tyre for a proper one. Let the air out of the spare tyre and put it back in its stowage place. |
| Page 8:58 Changing wheels |
| NOTE! When changing a wheel (for example from summer wheels to winter wheels), mark the wheels when you remove them so that they can be re-fitted in the same place and take up the same position on the real hub as they did before being removed. In this way you will avoid the risk of having to re-balanced the wheels when fitting them on again |
 |
|
Changing wheels | ||
| The spare wheel, air compressor, jack and tool kit are stored in the boot. When about to change a wheel, apply the parking brake, engage 1st gear or position P if it has an automatic transmission. Place chocks in front of and behind the wheels re- maining on the ground. |
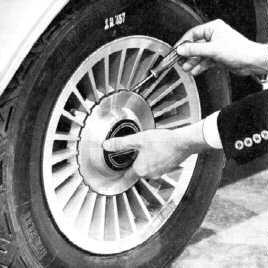
Slacken the wheel cap the help of the tommy bar or a screwdriver belonging to the tool kit. |
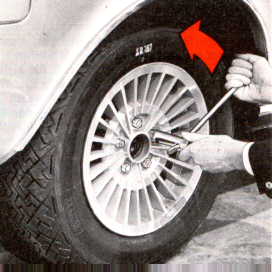
Slacken the wheel nuts a ½-1 turn with the box spanner. The nuts are slackened by turning them anti- clockwise. |
| Page 8:59 Changing wheels |
 |
 |
|
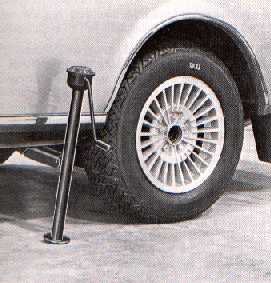
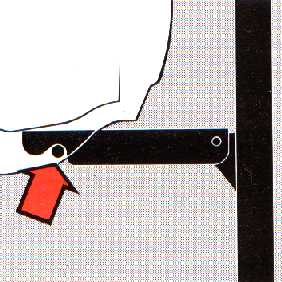
| Place the jack in the jack attachment next to the wheel to be raised. |
Make sure that the arm is logged well in the attachment as shown in the above illustration. Jack up the car so that the wheel is off the ground. Remove the wheel nuts and lift off the wheel. Take care not to damage the threads on the wheel studs. |
Fittting the spare wheelsee page 57.Fitting wheels, generaland hub. crosswise. Tighten them to a torque of 100- 130 Nm (10-13 kgf m=74-96 lbf ft). |
![]()